The 5 Step Guide for moving your site from http to https smoothly

5 Step Guide to HTTPS

Moving your website to https does not have to be scary

I have scoured the web trying to find a guide or video that would give me answers on this subject. There have been always important keys to the process I thought were missing. I am posting this article to hopefully simplify the process and make website designers more comfortable with the move to HTTPS.

After Google started really pushing the SSL protocol. Toward the beginning of 2016, our digital marketing agency has started to make it mandatory for all sites to have https socket encryption. Even websites that don’t have forms, eCommerce or some sort of user input will start to need it just for the browser trust and ranking boost. Toward  the end of this year, browsers are going to start throwing up more elaborate warning signals. Websites that have not moved over so it will become more evident very soon.

I’ve installed certificates many times before. On older sites that have authority and great PR (Page Rank) that could be damaged, I really wanted to make sure I understood the process. This is our simplified step by step guide to moving to https.
 

1. Figure out what sort of certificate you need

There are different SSL certificate providers, VeriSignGeoTrustComodo and Thawte to name a few. They range from 128Bit – to – 256Bit encryption types. Prices for these certificates are all over the place ranging from 10$ a year on up to 700$ or more for wildcard and additional insurance options. Each company offers different seals and authoritative labels to show off. 

SSL Providers

I like to find one provider and stick to them. This way I have one account to monitor for certificate expiration and as the list grows there won’t be any surprises. Once you have picked a provider or re-seller, (We use Comodo for example) purchase the cert that best works for you or your client. For example, if your client has an eCommerce website, it might be prudent to buy a certificate with more authority and encryption. This will show visitors you are serious about keeping their transactions private. If a website has a form or two, or your just trying to secure a brochure website, I don’t think it is necessary to spend the extra money.

2. Purchase the certificate

There are 3 parts a secure certificate

  • CSR (Certificate Signing Request)
This is the first thing you need to get in order to purchase a secure cert. It typically is a key that has your company and domain information associated with it. You can generate a CSR though a CSR generator online or using your server’s Cpanel or SSH. If you have domain privacy protection on your domain name, you might want to take that off temporarily. This way the certificate can be authenticated during the purchase.
  • CSR (Private Key)
Once you have obtained the CSR, save the string in a .txt file. It should also have a second string that is your (Private Key). This is important because it is required to install the certificate on your hosting environment. The Private Key is what your server uses to decrypt the information that is being sent and received.
  • CRT (Certificate)
When you buy the certificate, the provider will first ask for the (CSR). Paste that in when it is requested. The provider will then ask for the domain and general info associated with the domain. Information such as; company name, location, phone number. Based on the information they receive from your domain name you will have a few optional ways to prove that you are the owner of that domain. I usually use the administrative email to receive the email of authentication from Comodo for example.
 
Once you have received the email and authenticated the domain and certificate. The provider typically will email you a zip file with the CRT and CRT Bundle files in them. Save this file where you saved your CSR and Private Key so you will have everything you need to install it in one place.

3. Install The CRT

Up until very recently, you used to have to purchase a dedicated IP address to install a CRT.  Currently, most hosting providers support (SNI) Server Name Indication. This allows your server to treat your domain name like an IP address. Unless you are on a hosting environment that has not been updated in a while this should already be available.
 
Depending on what web host you are using, you should have an option to install the SSL though a GUI interface or using SSH. All you need to install the CRT is the CRT string and Private Key string that came with your CSR.
 
Once installed you should be able to reach your website via HTTPS in a browser. There is some work left to do though we don’t want to switch the site completely over till we have made some adjustments.

4. Check and modify paths to all your website resources

To have that nice shiny little green lock show up correctly to the left of the address bar, you need to make sure all resources on the website are using the https: protocol. If you are using a popular CMS like Joomla!, WordPress or Drupal, most of your resources should be relative. This meaning they point directly to the folder of the resource rather than the direct URL. In a lot of cases you still have to find those resources and change the path to reflect https.

Screaming Frog - Check Links

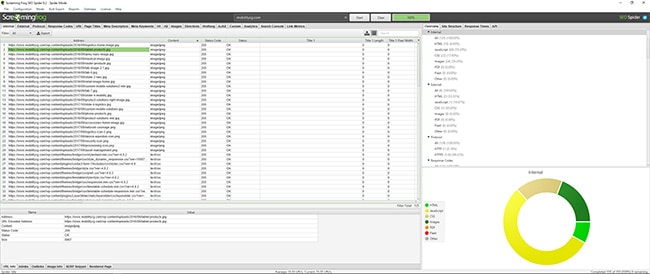
All resources like images, JS, CSS, PDF, JSP need to located and changed if they are statically set to http. A great tool to use in order to find these resources as well as troubleshoot the entire process is called Screaming Frog. Screaming Frog gives you a full rundown and overview of your website, it’s link anatomy, and resource response codes. You can download the free version here. It is extremely valuable for understanding how your website is put together and how to improve on your SEO.
bluelightlabs

Once you have all your resources and internal links changed to https you should see the following when accessing your site. Make sure you check as many pages as you can as well as modify all static internal links in the content.

bluelightlabs

4. Force website to use https

If you are using a CMS you can force all the http URL to (301 Redirect) to their new https versions. This is necessary to let slurps, especially Google, know that you are making the switch when being indexed next. This way each page of your site will not lose it’s reputation. If the CMS does not have the option, you can add redirect statements to your .htaccess file in your root directory to do so.
 
Check your robots.txt to make sure there are no http references as well, then build or rebuild your xml sitemap to reflect https.

5. Clean up and give it a few days (Google Webmaster Tools)

This is, in my opinion, the most important part of moving the site.  If the website already has a (Google Search Console) formally known as (Webmaster Tools) account. Login and make sure you are the owner of the old http version. Do not delete the old profile yet! Create an entirely new profile but this time using https. Google might make you authenticate the domain again with a file upload or DNS txt record. Most of the time it will use the old one if it is still up there. Once you have created a new profile submit the new xml sitemap referencing the https version.
 
In 3-4 Days you should see the traffic start to trickle into the https profile version. At this point you can go ahead and remove the old http property.
 
If you really want to do your due diligence. Go to as many external sites that you have access to and change your sites URL reference to https. Examples would be Yelp, FaceBook, Twitter, Google Local Business / maps. Find any others that come to mind and make the change.
 
Once all is set and done you might want to install an additional site seal. This will show your visitors that their submitted information is secure. The directions for adding the JavaScript and image file should have been sent to you with the CRT purchase order. If not you should be able to find out how to get it on their website.
bluelightlabs

Congrats!!
Now find where you were in Game of Thrones and chill out.

Share on facebook
Facebook
Share on twitter
Twitter
Share on linkedin
LinkedIn
Share on reddit
Reddit